
Are you ready to elevate your nail game without stepping foot in a salon? Enter the world of the Russian manicure—a meticulous, detail-oriented technique that promises perfectly polished nails. This innovative approach not only enhances the beauty of your digits but also offers long-lasting results that can keep your hands looking fabulous for weeks. If you’re intrigued by how this unique method works and want to try it from the comfort of home, you’re in luck! In this guide, we’ll explore everything you need to know about achieving a stunning Russian manicure on your own. From essential tools to step-by-step instructions, get ready to transform your manicure routine into an art form!
What is a Russian Manicure?
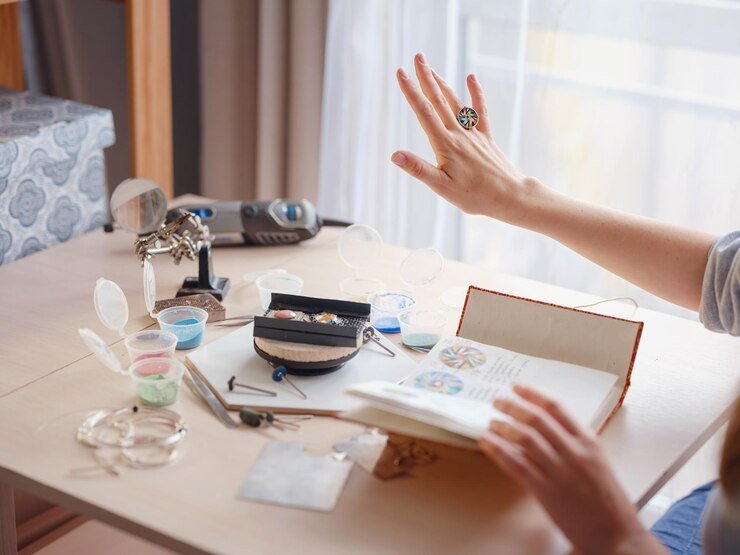
The Russian manicure is a specialized nail care technique that focuses on precision and detail. Unlike traditional methods, it emphasizes the removal of cuticles without damaging the surrounding skin.
This approach often uses electric files to gently buff away dead skin cells and tidily shape nails. The result? A clean, polished look that lasts longer than conventional manicures.
Originating in Eastern Europe, this method has gained popularity worldwide for its meticulous results. It’s perfect for those who want their nails to look immaculate without frequent trips to the salon.
One of the key features is its ability to address hangnails effectively while promoting healthy nail growth. With a little practice, you can achieve professional-quality results right at home.
Benefits of Doing a Russian Manicure at Home
Doing a Russian manicure at home offers several advantages. First, it’s incredibly cost-effective. Salon visits can add up quickly, but with the right tools and some practice, you can achieve salon-quality results without breaking the bank.
Convenience is another key benefit. You can pamper yourself at any time that suits your schedule. No need to rush or book appointments—just set aside some time for self-care whenever you feel like it.
Additionally, mastering this technique allows for greater customization of your nail care routine. You have complete control over products used and techniques applied, ensuring they align perfectly with your preferences.
Moreover, practicing a Russian manicure helps improve your skills and knowledge about nail health. As you become more familiar with your nails’ needs, you’ll be able to maintain them better in the long run. This empowerment adds to the overall enjoyment of DIY manicures.
Necessary Tools and Products for a DIY Russian Manicure
Creating a stunning Russian manicure at home requires the right tools. Start with a cuticle pusher and remover to gently push back and eliminate excess cuticle. This step is crucial for achieving that clean look.
Next, nail nippers are essential for trimming any stubborn hangnails or overgrown cuticles. Precision is key here, so opt for high-quality nippers.
Don’t forget nail scissors; they come in handy for shaping nails with accuracy. A good nail file will help smooth edges and create your desired shape.
Invest in some nourishing cuticle oil to keep your nails healthy post-manicure. It ensures hydration while enhancing shine, making everything look polished and perfect.
With these essential tools within reach, you’re well on your way to mastering the art of a Russian manicure at home.
Step-by-Step Guide for a Perfect Russian Manicure at Home
Start by gathering all your tools. Ensure you have a cuticle pusher, nail nippers, and a fine nail file ready.
Begin with soaking your nails in warm water for a few minutes to soften the cuticles. This step makes everything easier.
Gently push back your cuticles using the pusher. Be cautious not to damage the surrounding skin.
Next, trim any excess cuticle growth with your nippers. Precision is key; take small snips to avoid over-trimming.
Shape your nails using a fine nail file. Opt for an almond or square shape depending on your preference.
Apply some cuticle oil generously around each nail and massage it in well to nourish the area.
Finish up with a clear base coat before adding color if desired. This helps protect both the nail bed and enhances longevity!
Comparison between Professional and At-Home Russian Manicures
When comparing professional and at-home Russian manicures, the first thing to consider is skill level. Professionals have extensive training and experience, allowing them to deliver impeccable results. Their techniques often guarantee a cleaner look with less risk of injury.
At home, you have the freedom to go at your own pace. This convenience allows for flexibility in scheduling. You can easily fit a manicure into your day without making an appointment.
Cost is another factor. Professional services can be pricey over time, while doing it yourself saves money in the long run. However, initial investment in quality tools may be necessary.
Personal preference plays a crucial role. Some enjoy the pampering aspect of visiting a salon, while others find satisfaction in mastering their technique at home and experimenting with different styles.”
Tips and Tricks for a Professional-Looking Manicure
For a professional-looking Russian manicure, precision is key. Start by ensuring your workspace is clean and well-lit. This helps you focus on the details of your nails without distractions.
Use a high-quality cuticle pusher to gently push back the cuticles. Avoid any forceful movements; patience pays off here.
When it comes to filing, choose a fine-grit file for smooth edges. Always file in one direction to prevent splitting or damage.
Applying cuticle oil after cleaning will nourish your nails and enhance their appearance. A little goes a long way!
Consider using nail polish with a quick-dry formula or topcoat for that salon-fresh finish. Allowing ample drying time prevents smudges and keeps your manicure looking pristine longer.
Maintaining Your Nails After a Russian Manicure
After enjoying a beautiful Russian manicure, maintaining that fresh look is key. Start by applying cuticle oil daily. This nourishes your nails and keeps the cuticles soft.
Avoid harsh chemicals whenever possible. Household cleaners can weaken nails over time, so consider using gloves to protect them during chores.
Regular hydration is essential too. Drink plenty of water to keep your nails strong from the inside out. A well-balanced diet rich in vitamins will also contribute to nail health.
Try not to use your nails as tools; this can lead to chips or breaks that ruin your perfect manicure. Instead, reach for proper instruments when opening packages or performing tasks.
Schedule touch-ups as needed, especially if you notice any signs of growth around the cuticles or if polish starts chipping away. Keeping up with these simple practices will extend the life of your stunning Russian manicure.
Tools Needed for a Russian Manicure
To achieve a flawless Russian manicure, having the right tools is essential. Start with a high-quality cuticle pusher and remover. This will help you gently push back and remove any excess skin around your nails.
Next on the list are nail nippers. These are perfect for trimming hangnails and dead skin that can interfere with your manicure’s neat finish. Choose a pair that’s easy to handle for precision work.
Nail scissors come in handy as well, allowing you to shape your nails to perfection before applying polish. A good nail file is crucial too; opt for one that’s gentle yet effective in smoothing out edges without causing damage.
Don’t forget cuticle oil! It nourishes and hydrates your cuticles, keeping them healthy between manicures. Each tool plays an important role in achieving that salon-worthy look from the comfort of home.
A. Cuticle Pusher and Remover
A cuticle pusher and remover is an essential tool in achieving a flawless Russian manicure. It allows you to gently push back the cuticles, creating a clean and polished look for your nails.
Using this tool correctly can help prevent damage to the nail bed. Opt for one with a rounded edge for comfortable use. The design should allow easy handling while ensuring precision during cleaning.
When applying it, be gentle. Excess pressure can cause discomfort or injury. Always work from the sides toward the center of the nail.
After pushing back the cuticles, using a remover helps eliminate any dead skin or debris that may linger. This will ensure that your polish adheres effectively and lasts longer without peeling or chipping.
Choosing high-quality materials ensures durability and hygiene, making them worth investing in for regular at-home manicures.
B. Nail Nippers
Nail nippers are an essential tool in any Russian manicure kit. They help achieve that clean and precise look many strive for. With their sharp blades, they can easily trim excess cuticle and hangnails without damaging the surrounding skin.
Using nail nippers requires a steady hand. It’s important to approach this task with care to avoid any accidental snips. A well-designed pair allows for great maneuverability, making it easier to reach those tricky spots around your nails.
When choosing nail nippers, opt for a high-quality stainless steel option. They tend to last longer and provide better precision compared to cheaper alternatives. Regular maintenance is key; keep them sanitized and oiled for optimal performance.
Incorporating nail nippers into your routine can elevate your at-home manicure experience significantly, giving you salon-quality results right from the comfort of home.
C. Nail Scissors
Nail scissors are an essential tool in achieving the perfect Russian manicure. Unlike regular nail clippers, these scissors allow for more precision and control. Their sharp blades can easily trim even the tiniest hangnails or irregular edges.
When choosing nail scissors, look for a pair that is ergonomically designed. This ensures comfort during use and helps prevent hand fatigue. Stainless steel options are highly recommended as they resist rust and maintain their sharpness longer.
It’s important to keep your nail scissors sanitized before each use. A simple wipe with alcohol will do the trick, ensuring cleanliness while you work on your nails.
The right technique matters too! Use smooth, controlled motions when trimming your nails to avoid any snags or uneven cuts. With practice, you’ll master this skill and elevate your at-home manicure experience significantly.
D. Nail File
A nail file is an essential tool in any manicure kit, especially for achieving the perfect Russian manicure. It helps shape and refine your nails to create a polished look.
When choosing a nail file, consider the grit. A finer grit is ideal for natural nails as it prevents splitting or tearing. You can opt for glass or emery boards, depending on your preference.
Using a nail file correctly makes all the difference. Always file in one direction rather than back-and-forth motions to avoid damaging the nail’s structure. This technique promotes healthy growth and keeps your nails looking pristine.
Regularly replacing your nail files ensures effectiveness too. Worn-out files can lead to uneven edges and snagging, detracting from that flawless finish you strive for with every Russian manicure session.
E. Cuticle Oil
Cuticle oil is an essential product in your Russian manicure toolkit. It nourishes and hydrates the skin around your nails, preventing dryness and cracking. This step can make a noticeable difference in the overall appearance of your manicure.
Applying cuticle oil regularly promotes healthy nail growth. It softens hard cuticles, making them easier to manage during your manicure process. Choose an oil infused with natural ingredients for maximum benefits—think jojoba or almond oil.
Massage it gently into the cuticles after completing your manicure for that polished finish. Not only does this enhance the look of your nails, but it also provides lasting moisture throughout the day.
Incorporating this simple step elevates your at-home routine to professional standards. A little goes a long way, ensuring you maintain beautiful and healthy nails between manicures.
Step-by-Step Guide to a Russian Manicure
Start by prepping your nails. Remove any old polish, then wash your hands with soap and water.
Next, soak your fingers in warm water for about 5 minutes. This helps to soften the cuticles.
Gently push back the cuticles using a cuticle pusher. Be careful not to apply too much pressure; this step is all about finesse.
Use nail nippers to carefully trim excess cuticle growth. Precision is key here—only remove what’s necessary for a clean look.
Follow up with nail scissors to shape any uneven edges on your nails. Aim for smooth lines that suit your style.
File each nail at an angle for added definition, ensuring you file in one direction only to prevent splitting or damage.
Finish off by applying cuticle oil generously around the nails and massage it in well for hydration and shine.
Benefits of Doing a Russian Manicure at Home
Doing a Russian manicure at home offers convenience and flexibility. You can pamper yourself whenever you like, fitting it seamlessly into your schedule.
Cost savings are another major advantage. Salon visits can add up quickly, but with the right tools and practice, you can achieve salon-quality results without breaking the bank.
Moreover, personalizing your nails becomes easier. Choose colors and designs that reflect your style perfectly—no need to settle for what’s available at the salon.
Additionally, practicing this technique allows you to perfect your skills over time. With each session, you’ll become more comfortable and confident in creating beautiful manicures.
There’s something therapeutic about dedicating time to self-care in the comfort of your own space. It transforms routine nail care into a relaxing ritual that enhances both well-being and aesthetics.
Common Mistakes to Avoid During a Russian Manicure
One common mistake is rushing through the cuticle removal process. This delicate step requires patience and precision. Take your time to avoid damaging the nail bed.
Another pitfall is using excessive force with tools, especially nippers or scissors. Gentle pressure is key; being too aggressive can lead to painful cuts and irritation.
Neglecting proper sanitation of tools can also cause issues. Always disinfect your instruments before use to prevent infections or cross-contamination.
Skipping moisturizing after completing the manicure might seem minor, but it’s crucial for maintaining healthy nails and cuticles. A good cuticle oil will nourish your skin and enhance shine.
Don’t forget about filing techniques! Filing in one direction helps maintain nail strength instead of causing splits or breaks from back-and-forth motions. Pay attention to these details for a flawless finish every time you indulge in a Russian manicure at home.
Tips
Maintaining the beauty and integrity of your Russian manicure at home can be achieved with a few simple tips. First, always start with clean nails to prevent any infections or issues. Ensure that your tools are sanitized before each use; this is crucial for maintaining nail health.
When applying cuticle oil, make it a part of your daily routine. It helps keep the skin around your nails hydrated and prevents peeling. Remember to file in one direction rather than back and forth to avoid damaging the nail edges.
If you’re new to performing a Russian manicure, practice makes perfect. Don’t rush through the process; take your time to master each step properly. If you hit a snag while working on tricky areas like hangnails or stubborn cuticles, don’t hesitate to pause and reassess.
Listen to your nails! Pay attention if they feel sore or tender after a session—this may indicate that adjustments are needed in technique or pressure applied during grooming. By keeping these tips in mind, you’ll not only elevate your DIY skills but also enjoy beautifully maintained nails that reflect professionalism right from home!


